This post is long past due, and thanks to Alexandra Heyman who posted this question on our facebook page because it prompted us to answer this question for the rest of you.
"I have 2 vintage rose wraps and I love them but I have a hard time keeping them on, they always slide back and fall off. I'm wondering what the secret is to keeping them on."
There are some tips and tricks that can help you get the *BEST* out of your Vintage Rose Wrap.
First, we need to address the fact that some people's ears are set farther back than others, and occasionally--and I'm using that term super loosley because I've probably only had 2 or 3 people ever tell us this, but they {sometimes} are harder to wear for these people. I've seen them and we've tried and it's just harder for the headbands to stay on their heads.
Hopefully, these tips and tricks will be helpful in how you wear your Vintage Rose Wrap.
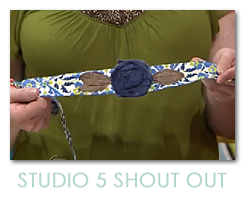
{1} ROSE PLACEMENT: First things first. If you hold your headband out from hand to hand, you will see that the rose if slightly offset from the middle. We will refer to the side closest to your hand as the "shorter" side. Upon adorning your head, we suggest putting the "shorter" side of the headband with the rose ON TOP or TO THE SIDE OF YOUR HAIR PART {closest to your ear}. Once you've done this, you're assured to have the correct placement for the rose and the ends will match better in the back.
{2} TAUT: taut/tôt/Adjective 1. Stretched or pulled tight; not slack. Okay--this is very important. There's nothing worse than seeing someone with a loosey goosey headband--and some people do tie their headbands too tight as well. There is a happy medium and it is found in the wonderful word, taut.
The natural fibers of your headband allow for a slight stretch as you tie it to your head. The more you wear your headband, the more you will be able to see how the stretch of the fabric will start to shape to your head. You sort of have to "train" the headband. After a couple of times wearing it, it will fit your size and shape of head better than if you put it on the first time. The key is to tie it tight enough so it's not lose or you don't have a pucker on the back side of your wrap {closest to your crown} but not too tight so it starts to slip off your head. {This could very well be the answer to your inquiry, Alexandra}
Occasionally, we have someone who tells us they've put velcro underneath their headband so the headband stays better on their shape of head. Believe me when I tell you that we have explored this idea--but the truth is, we don't think you need it. If you follow these instructions, the headband stays just fine through most of the day. Yes you might need to fix it like you would any other accessory you wear --but we stand by our headbands and the many comments from happy customers who say, "They are so comfortable I sometimes forget I'm wearing it."
With that said...
{3} 1-2-3 CHECK: Because they ARE so comfortable, we DO forget to check on them throughout the day. Sometimes they just loosen up from start of day to end, and we don't even realize that happens. DO please check your headbands occasionally. Just by simply re-tying them when you redo your hair {following are tricks we've told you} give your wrap a chance to look fabulous on you--all the time.
{4} CLEAN TUCK & TIE: Sometimes it's hard to make a nice clean tie--especially if you are wearing it when the rest of your hair is down. If this is the case, may we suggest throwing your hair in a hair claw for a brief moment so you can make the clean tie. THEN, tuck those ends! Some people do prefer keeping the ties hanging down, and occasionally I do that, especially on my 2-year old, but for the most part--tuck, tuck, tuck! It looks so much better if you tie, then tuck the ends back up underneath the bands.
{5} EARS + HEADBAND: Generally, our headwrap bands are meant to go behind the ear. HOWEVER, because they are handmade and the nature of that results in some variation of band width, sometimes bands do better when they can cover a portion of the ear. That is especially true if you are outfitting a smaller child with our headands. I do this especially with my 2-year old as well. The width of the band just doesn't do well with her size of head and ear placement. SO, I just tie and cover some of her ears, and be sure her hair comes out over the band so it doesn't look too funny.
{6} CARE + KEEPING: We have plans in the future to offer ideas of how to store your headbands--so stay tuned for more info regarding that. As for the care of your headbands, it is best to hand spot any dirty parts of your band. We do not recommend throwing it in the wash. Hand washing would be the best if needed. Also, freshen them up occasionally by using an iron or a flat iron to run the band through it to iron out the ends. This continues to be my favorite tip of all!
. . . . . . . . . . . . . . . . . . . . . . . . . . . . . . . .
We know all these things because we too love our headbands and wear them all the time! We want to insure each of you have the best chance to look great wearing one as well. Whether you wear them in the classic-style, or a bohemian-style all your own...our headbands are made to reflect the best part of you and your fabulous style. Hopefully these tips and tricks help you get the *BEST* out of your VRW!


No comments:
Post a Comment